
Chocolate Celebration Layer Cake: A Beginner‑to‑Intermediate Guide to Baking an Elegant Show‑Stopper
Ready to wow a crowd with a cake that looks as luxurious as it tastes? The Chocolate Celebration Layer Cake is a glamorous, yet approachable, recipe from celebrated patissier Eric Lanlards. With its rich chocolate sponge, silky butter icing, and glossy ganache, this cake makes an unforgettable centerpiece for birthdays, anniversaries, or any special occasion. In this post we’ll walk you through every detail— from the story behind the cake to ingredient highlights, a step‑by‑step method, and creative serving ideas—so you can bake it with confidence, even if you’re still polishing your pastry skills.
Meal Profile
| Attribute | Details |
|---|---|
| Title | Chocolate Celebration Layer Cake |
| Difficulty | Easy (perfect for beginner‑to‑intermediate bakers) |
| Portion | Serves 22‑24 |
| Total Time | Takes 1 hour 15 minutes to make, 1 hour 10 minutes to cook (plus cooling time) |
| Description | Patissier Eric Lanlards’s chocolate cake recipe makes for an elegant, glamorous and celebratory centre piece and a very special birthday cake. |
Pro tip: Even though the difficulty is marked “Easy,” the cake does involve a few classic pastry techniques—creaming butter, folding dry ingredients, and making a ganache. Mastering these will boost your confidence for future pâtisserie projects.
Ingredient Highlight
Below is the full ingredient list exactly as the original recipe specifies. Each component plays a crucial role in texture, flavor, or structure, and we’ll point out the why in the tips that follow.

Cake Layers
- 350 g unsalted butter, softened, plus extra for greasing
- 350 g golden caster sugar
- 50 ml black treacle
- 8 large free‑range eggs, lightly beaten
- 50 g dark chocolate (70 % cocoa solids), melted
- 1 tbsp chocolate extract (we like Nielsen‑Massey)
- 2 tsp vanilla bean paste or extract
- 2 tsp coffee extract (we like Nielsen‑Massey)
- 300 g self‑raising flour
- 50 g cocoa powder
- 2 tsp baking powder
- 50 g ground almonds
Butter Icing (for the layers)
- 125 g unsalted butter, softened
- 200 g icing sugar, sifted
- 1 tsp vanilla bean paste or extract
- 2 tsp chocolate extract
- 30 g dark chocolate (70 % cocoa solids), melted
- 2 tbsp single cream
Chocolate Ganache (the glossy finish)
- 250 g single cream
- 2 tsp vanilla bean paste or extract
- 2 tsp glucose syrup (available in the baking aisle of large supermarkets)
- 250 g dark chocolate (70 % cocoa solids), melted
- 25 g unsalted butter, softened
Optional Decoration
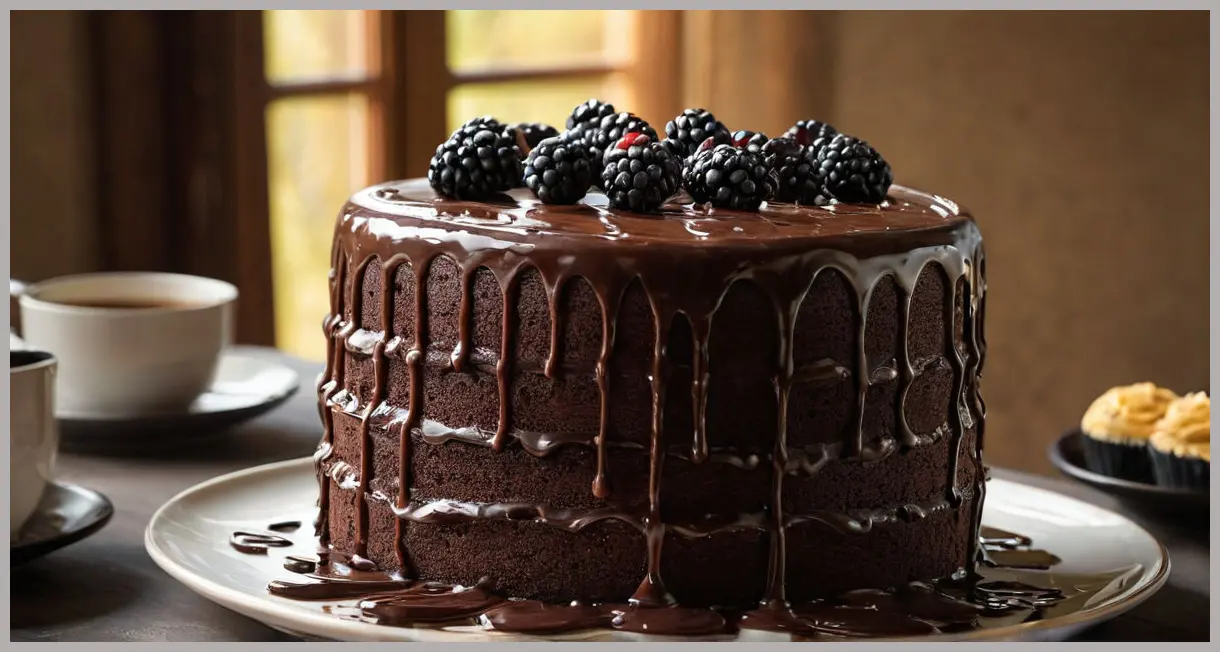
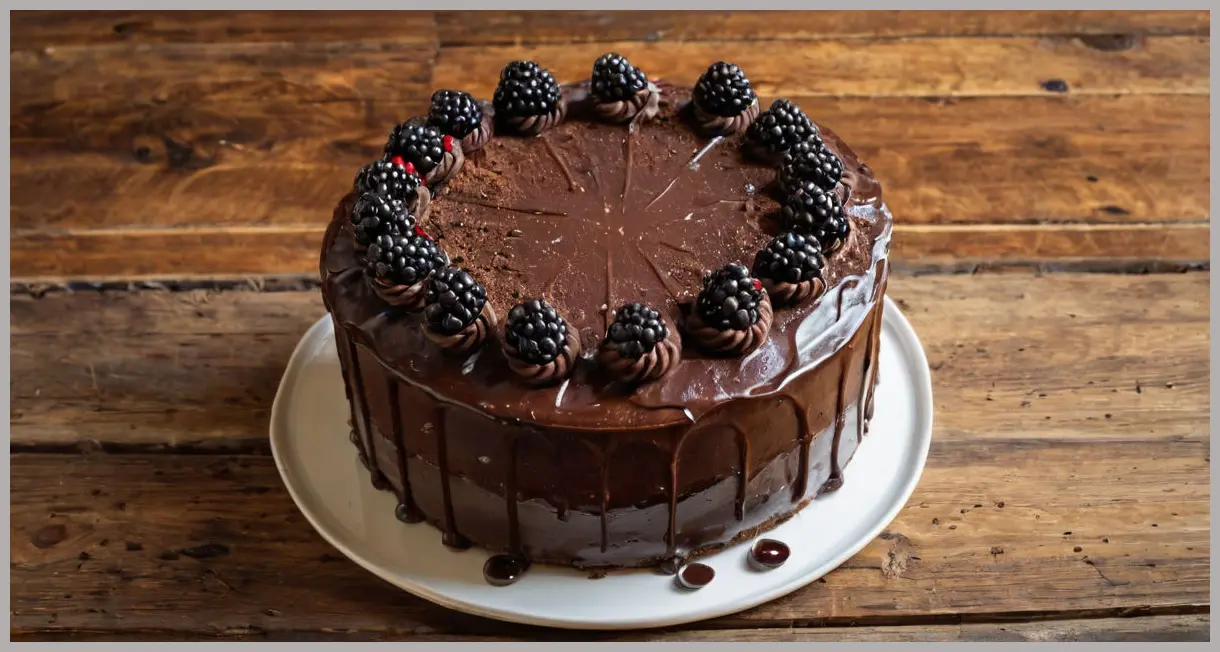
- Blackberries (for a pop of colour and tart contrast)
Why These Ingredients Matter
- Unsalted butter (both for the sponge and the icing) provides a clean, buttery base without extra salt that could interfere with the delicate balance of sweet and bitter chocolate.
- Golden caster sugar dissolves easily, giving the sponge a light, airy crumb.
- Black treacle adds depth and a subtle molasses note that enhances the chocolate’s richness without making the cake heavy.
- Coffee extract amplifies chocolate flavor through a phenomenon called “flavor synergy”—the bitter coffee lifts the cocoa notes.
- Ground almonds introduce a gentle nutty texture and keep the crumb tender, especially useful in a gluten‑light cake.
- Glucose syrup in the ganache prevents crystallisation, ensuring a smooth, glossy finish that stays glossy at room temperature.
Step‑by‑Step Instructions
Below is a numbered list that extracts each step directly from the original method. Follow the sequence, and refer to the accompanying tips after the list for extra success hacks.
-
Preheat the oven to 170 °C (fan 150 °C, gas 3½). Grease and line two deep round cake tins—one 15 cm diameter and one 20 cm diameter—with baking paper.
-
Cream the butter and sugar. In a large bowl, use an electric hand mixer to beat the 350 g softened butter with the golden caster sugar until the mixture is light and fluffy. Add the black treacle and continue mixing.
-
Incorporate the eggs. Beat the eggs in a slow stream, adding a little at a time while the mixer runs on a low speed. This prevents the batter from curdling and keeps the sponge tender.
-
Add the chocolate and flavour extracts. Fold in the melted 50 g dark chocolate, 1 tbsp chocolate extract, 2 tsp vanilla bean paste (or extract), and 2 tsp coffee extract until fully combined.
-
Sift and fold dry ingredients. Sift together the self‑raising flour, cocoa powder, and baking powder. Gently fold the dry mixture into the wet batter, then fold in the 50 g ground almonds. The batter should be smooth and glossy.
-
Portion the batter. Divide the batter evenly between the prepared tins, filling each about three‑quarters full.
-
Bake the sponges.
- Small (15 cm) cake: bake for 55 minutes.
- Large (20 cm) cake: bake for 1 hour 10 minutes.
Insert a skewer into the centre of each cake; it should come out clean when the sponge is done.
-
Cool the sponges. Remove the cakes from the oven and let them sit in their tins for 10 minutes. Then turn them out onto wire racks and allow them to cool completely.
-
Prepare the butter icing. Using an electric hand mixer, cream the 125 g softened butter with the sifted icing sugar until the mixture is soft and light. Add 1 tsp vanilla bean paste, 2 tsp chocolate extract, the melted 30 g dark chocolate, and 2 tbsp single cream. Beat until smooth and fluffy, being careful not to over‑beat (which can cause the icing to split).
-
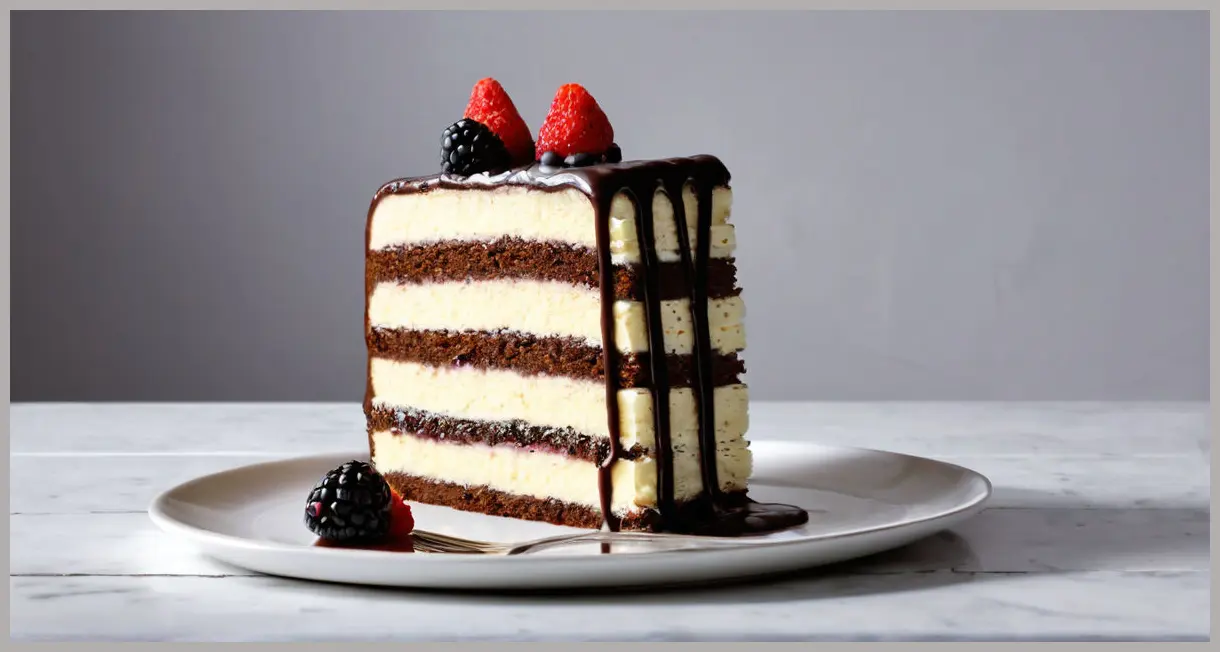
Slice the sponges. Once completely cool, carefully slice each cake horizontally into three even layers (you’ll end up with six layers total: three from the large cake and three from the small cake).
-
Assemble the cake.
- Place the top layer of the large sponge on a serving plate, cut‑side up.
- Spread a generous layer of butter icing over it (see tip for an even spread).
- Add the second large sponge layer and repeat the icing.
- Continue stacking until all three large layers are used.
- Stack the three small‑cake layers on top of the large‑cake stack, using butter icing between each layer.
- Set the assembled cake aside in a cool place while you finish the ganache.
-
Make the ganache. Gently warm the 250 g single cream in a small saucepan. Stir in 2 tsp vanilla bean paste and the glucose syrup. Remove from heat and fold in the 250 g melted dark chocolate, stirring until the mixture is smooth. Finally, stir in the 25 g softened butter until fully incorporated.
-
Finish the cake. Allow the ganache to sit for a few minutes, stirring occasionally, until it reaches a spreadable consistency. Using a palette knife, spread the ganache evenly over the entire cake, smoothing the surface for a sleek finish.
-
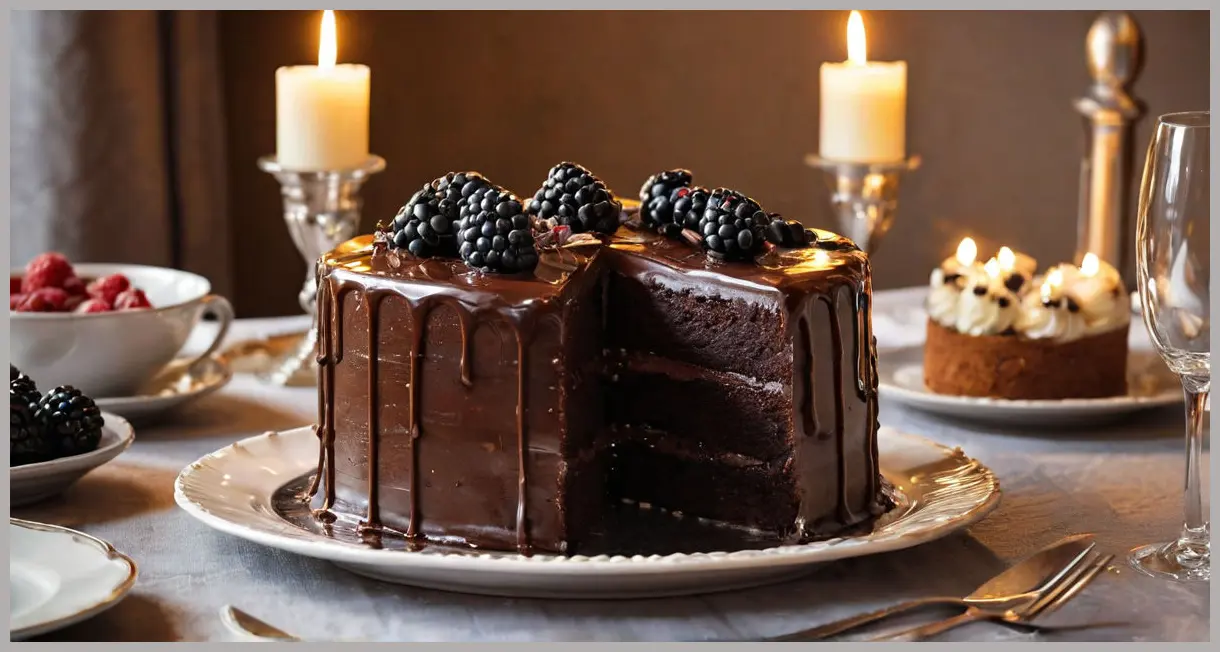
Decorate (optional). Garnish with fresh blackberries and candles for a festive look, then serve your Chocolate Celebration Layer Cake to delighted guests!
Pro Tips for a Flawless Cake
| Step | Tip |
|---|---|
| 1 – Oven prep | Rotate the tins halfway through baking to ensure even colour, especially if your oven has hot spots. |
| 2 – Creaming butter | Scrape down the sides of the bowl every 30 seconds; this guarantees a uniform, airy butter‑sugar mixture. |
| 5 – Folding dry ingredients | Use a gentle “cut‑and‑fold” motion with a rubber spatula. Over‑mixing can develop gluten, making the cake dense. |
| 7 – Baking time | If you’re at a high altitude, add 5–10 minutes to the baking time and increase the oven temperature by 10 °C. |
| 9 – Icing texture | If the icing looks too thick, add a splash (≈1 tbsp) of cream. If it’s too runny, add a spoonful more icing sugar. |
| 11 – Layer alignment | Use a ruler or a cake leveler to keep each layer even; uneven layers can cause the cake to tip over. |
| 12 – Ganache consistency | For a firmer ganache (good for warm climates), let it cool longer before spreading; for a softer glaze, spread while still warm. |
| 14 – Decoration | Pat the blackberries lightly with a dab of melted chocolate before placing them; this prevents them from sinking into the ganache. |
Serving Suggestions & Variations
Classic Presentation
- Serve at room temperature for optimal flavor. Cut generous slices with a hot, wet knife (dip the blade in hot water and wipe dry between cuts) to achieve clean, neat pieces.
- Pair with a glass of ruby red wine (e.g., a Shiraz) or a rich espresso to echo the coffee notes in the sponge.
Lightening the Cake
- Substitute half of the self‑raising flour with almond flour for a slightly lighter crumb and a subtle nutty aroma.
- Replace the single cream in the ganache with half‑and‑half for a marginally less decadent finish.
Flavor Twists
| Variation | How to Adapt |
|---|---|
| Orange‑Infused | Add 1 tsp orange zest to the butter icing and a few drops of orange extract to the ganache. |
| Salted Caramel | Swirl a thin ribbon of homemade salted caramel into the ganache before spreading. |
| Nutty Crunch | Sprinkle toasted hazelnut pieces between layers for added texture. |
| Vegan Friendly | Use plant‑based butter and a vegan chocolate (70 % cocoa, dairy‑free) for the sponge and ganache; replace the cream with coconut cream. |
Storage
- Refrigerated: Cover the cake loosely with plastic wrap and store in the fridge for up to 3 days. Bring to room temperature for 30 minutes before serving to restore the ganache’s sheen.
- Frozen: Wrap the assembled cake tightly in a double layer of cling film and then in an airtight container. It will keep for up to 2 months. Thaw overnight in the fridge, then let sit at room temperature for an hour before serving.
Conclusion
The Chocolate Celebration Layer Cake proves that an “easy” label doesn’t mean you have to sacrifice elegance. By mastering a handful of fundamental techniques—creaming butter, folding dry ingredients, and creating a silky ganache—you’ll produce a cake that looks like it belongs in a five‑star patisserie while still being within reach of a home kitchen.
Whether you’re celebrating a milestone birthday, a graduation, or simply craving a luxurious chocolate treat, this cake delivers layers of moist chocolate sponge, buttery richness, and glossy ganache that will earn applause from friends and family alike.
Take the time to respect each step, use quality ingredients, and enjoy the process. Baking is as much about the journey as the final slice, and with this recipe you’ll gain confidence to tackle even more ambitious desserts in the future.
Happy baking, and may your celebrations be as sweet as this Chocolate Celebration Layer Cake!

Leave a Reply